Introduction to Histology
Scope & Levels of Organization
Open any organ in your gross-anatomy lab and you see structure. Slice that organ paper-thin, drop colour into it, and slide it under a microscope and you see something else entirely — a city of cells with streets, walls, factories and gardens. Histology (Greek histos, tissue) is the study of that city: the microscopic structure of normal tissues and organs, always paired with what each part actually does.
Why bother with the microscope at all when gross anatomy already tells you where the liver is? Because every function the body performs — absorption, secretion, contraction, conduction, defence — happens at the scale of cells and the matrix between them. You cannot understand physiology without seeing the secretory cell. You cannot recognise pathology without first knowing what the healthy slide looks like. Histology is the structural bridge that sits exactly between gross anatomy and cell biology, and the vocabulary you learn in this unit will be the language of every later unit.
Histology is the science that studies the microstructure of the normal human body (under the light microscope and electron microscope) together with the related functions of those structures.
It helps to keep four levels of organisation in your head as you look at any slide. You always start at the smallest unit — cell + extracellular matrix — and zoom outward to tissue, organ, and system. The ratio of cells to matrix is what tells your eye, in a single glance, which of the four basic tissues you are looking at.
| Level | What it means | Studied with |
|---|---|---|
| Cell + extracellular matrix (ECM) | The two basic building components of all tissues. Cells are the living units; ECM is the non-living material (fibres + ground substance) between them. | LM + EM |
| Tissue | An organised aggregate of cells + ECM with a common function. Only four basic tissue types exist (see below). | LM (routine) |
| Organ | Several tissues combined into a functional structural unit (e.g. liver, kidney). | LM (low power) |
| System | Organs working together for a major body function (e.g. digestive system). | Gross + LM |
Here is the great simplification of histology: the entire body, every organ from cornea to colon, is built from just four kinds of tissue. Learn these four well and the rest of the year is mostly learning how organs combine them in different proportions.
The trick when you put a slide under low power is to ask one question first: are the cells packed wall-to-wall, or are they scattered in a sea of matrix? If you see densely packed cells touching each other with almost no gap, you are looking at epithelium. If you see small dark cells widely spaced in abundant pink or clear material, you are looking at connective tissue. Long, parallel, striated cells — muscle. Tangles of fine processes with star-shaped or pyramid-shaped cells — nervous tissue. That single cell-to-matrix judgement carries you through 90% of slide identification.
| Basic tissue | Defining feature | Cells : ECM ratio | Course unit |
|---|---|---|---|
| Epithelial tissue | Closely packed cells, very little ECM; covers surfaces / lines cavities / forms glands; avascular, polarised, rests on a basement membrane | Cells » ECM | Unit 2 |
| Connective tissue | Few scattered cells in abundant ECM (fibres + ground substance); supports, connects, defends; richly vascular | ECM » cells | Units 3–4 (incl. cartilage, bone, blood) |
| Muscle tissue | Elongated contractile cells rich in actin & myosin filaments; generates force/movement | Cells dominant | Unit 5 |
| Nervous tissue | Neurons (excitable, conduct impulses) + supporting neuroglia; receives, integrates, transmits information | Cells dominant | Unit 6 |
Think of the four tissues as four building materials. Epithelium is brickwork — cells mortared tight, forming walls and linings. Connective tissue is concrete — a small amount of cell-aggregate suspended in a large amount of structural matrix. Muscle is the cable — long fibres that pull. Nervous tissue is the wiring — cells whose job is to carry signals. Every organ is a different blend of these four materials.
“Every Cell Must Network” → Epithelial, Connective, Muscle, Nervous. The single discriminator on a slide is the cell-to-matrix ratio: epithelium = wall-to-wall cells with almost no gap; connective tissue = lots of pink/clear matrix with widely-spaced cells.
• Which tissue has the highest cell-to-matrix ratio? → Epithelium (cells touching, ECM minimal).
• Which tissue is dominated by matrix? → Connective tissue (cells few, matrix abundant).
• Which two tissues are avascular as a rule? → Epithelium — supplied by diffusion through its basement membrane (cartilage too, but that is a connective tissue).
• What two components make up the extracellular matrix? → Fibres + ground substance (with tissue fluid).
Tissue Preparation for Light Microscopy
Why do we fix tissue? Because the moment you cut it, autolytic enzymes inside every cell begin to digest the cell from the inside, and bacteria from the surface begin to do the same from the outside. Within hours an unfixed piece of liver is mush. Living tissue is also thick, soft, colourless and full of water — useless under a microscope that needs a thin, hard, coloured slice. The whole purpose of the tissue-preparation workflow is to convert a slippery piece of fresh organ into a paper-thin, coloured, permanent slide that will sit in the museum drawer in 50 years and still look the same.
There are two broad routes: sectioning (the tissue is hardened so it can be cut into thin slices), and non-sectioning preparations (smears, stretched membranes, ground sections) where the tissue is thin enough to view whole. The sectioning route — specifically the paraffin H&E slide — accounts for the overwhelming majority of slides you will ever see, so master it first.
The paraffin section stained with haematoxylin and eosin (H&E) is the standard preparation behind more than 90% of histology slides and almost all of diagnostic pathology. The seven steps run in a fixed order, and each step exists to undo a problem created by the previous one. Tissue is full of water; paraffin wax is not water-miscible — so you must dehydrate. Once dehydrated in alcohol, the alcohol is not wax-miscible either — so you must clear with xylene, which is miscible with both. Only then can wax infiltrate the tissue and harden it enough to be cut. Knowing why each step exists is what locks the order in your memory.
| Step | Reagent / tool | Purpose |
|---|---|---|
| 1. Obtain specimen | biopsy / autopsy | Get fresh tissue quickly to limit autolysis. |
| 2. Fixation | fixative — 10% neutral-buffered formalin (LM); glutaraldehyde (EM) | Cross-links proteins → kills cells, preserves structure, prevents decay & autolysis, hardens tissue. |
| 3. Dehydration | graded ethanol (50→70→...→100%) | Removes water (paraffin is not water-miscible). |
| 4. Clearing | xylene | Replaces ethanol with a paraffin-miscible solvent; renders tissue translucent. |
| 5. Embedding | molten paraffin wax | Infiltrates & supports the tissue so it can be cut into a hard block. |
| 6. Sectioning | microtome | Cuts ribbons 5–10 µm thick (commonly ~5 µm), mounted on a glass slide. |
| 7. Staining | H&E (after de-waxing & rehydration) | Provides colour contrast (see 1.3). |
Picture a fresh strawberry. To preserve it forever you would first kill the enzymes inside it (fix), then dry it (dehydrate), then dip it in something that can carry wax into it (clear), then encase it in wax (embed), then slice it on a meat slicer (section), then paint the slice (stain). Every step solves the next step's logistical problem. That is exactly the paraffin workflow.
“Fix Dead Cats, Else Stuff Stinks” → Fixation, Dehydration, Clearing, Embedding, Sectioning, Staining.
• Why graded ethanol, not 100% straight away? → Avoids brutal shrinkage and distortion of the tissue.
• What is the clearing agent and why is it needed? → Xylene — miscible with both ethanol and paraffin, so it bridges the two.
• Routine LM section thickness? → ~5–7 µm (microtome).
• Which is the last step — embedding or staining? → Staining (done after sectioning, on the mounted slide).
Paraffin is the workhorse but it has two costs — it is slow (overnight) and the alcohol/xylene/heat steps destroy lipids and most enzymes. Whenever speed or chemistry preservation matters, a different preparation is used.
The most important alternative is the frozen section. The surgeon is in theatre, a tumour margin has just been excised, and they need to know now whether the edge is clear before they close the patient. Paraffin would take overnight; a frozen section gives an answer in minutes. The fresh tissue is snap-frozen, cut on a cryostat, and stained immediately. As a bonus, because no alcohol or xylene ever touches the tissue, lipids and enzyme activity are preserved — which is why histochemistry for fat or enzyme localisation also uses frozen sections.
| Method | How | Used for / advantage |
|---|---|---|
| Frozen section | Tissue snap-frozen & cut on a cryostat; no dehydration/clearing/wax | Rapid (minutes) → intra-operative diagnosis; preserves lipids and enzyme activity (destroyed by xylene/heat in paraffin). |
| Collodion (celloidin) section | Embedding in collodion instead of wax | Large/hard specimens (e.g. whole eye, brain, decalcified bone). |
| Smear | Fluid/cells spread thinly on a slide (e.g. blood, bone marrow) | Single cells viewed whole — blood film with Wright/Giemsa stain. |
| Stretched (spread) preparation | Thin membranous tissue pulled flat (e.g. mesentery, loose CT) | Shows cells & fibres in surface view (fibroblasts, mast cells, fibres). |
| Ground preparation | Hard tissue ground down without decalcifying (e.g. enamel, dry bone) | Studies mineralised structure that cannot be sectioned with a knife. |
• Why does a frozen section preserve fat when paraffin does not? → No xylene/alcohol — fat is not dissolved out.
• A blood film is which kind of preparation? → A smear (Wright/Giemsa stain).
• How is dry bone or enamel studied if you cannot cut it? → Ground section.
Every step of processing leaves fingerprints. The tissue shrinks as it dehydrates, leaving clean cracks between cells; the microtome knife occasionally nicks the surface and drags a line across the section; folds appear when the floating ribbon is mounted; precipitated stain forms blue or pink dust on the slide; and the fat that used to fill an adipocyte has long since been dissolved away by xylene, leaving an empty round vacuole. None of these features exist in the living tissue. They are artefacts — and recognising them is half the battle of reading a slide.
The lesson is simple. Before you call a feature pathological, ask whether it could be processing damage. Empty round spaces are almost always dissolved fat or a lumen, not necrosis. Straight parallel scratches are knife marks, not fibres. The trained eye filters artefact from anatomy automatically.
An artefact is a structural feature or distortion seen in a prepared specimen that was produced during processing and does not exist in the living tissue.
• Why do adipocytes appear as empty vacuoles on H&E? → Xylene dissolved the fat out during clearing.
• Three common artefacts? → Shrinkage clefts, knife marks, folds (and stain precipitate).
• How do you study fat properly? → Frozen section + Sudan/osmium.
Staining & Tinctorial Affinity
Picture a section of tissue under the microscope before any dye is applied — what you see is almost nothing. Tissue is essentially transparent and colourless; nothing distinguishes nucleus from cytoplasm from collagen. Staining is what gives you a visible image. And staining is not magic: dyes are charged molecules that bind tissue components by simple charge attraction. A positively-charged dye binds negatively-charged things, and vice versa. That single idea — the chemistry of basophilia and acidophilia — is the most important concept in the whole of microscopy, because it is what lets you read every later slide.
Routine H&E uses two dyes of opposite charge. Haematoxylin behaves as a basic (cationic, positively-charged) dye; it binds the acidic (anionic, negatively-charged) parts of the cell — chiefly the phosphate backbone of DNA and RNA — and colours them blue-purple. Structures that take up haematoxylin are called basophilic because they “love the base.” Eosin is the opposite: an acidic (anionic) dye that binds positively-charged groups on cytoplasmic and collagen proteins, painting them pink-red. These structures are acidophilic (synonym: eosinophilic). Anything that takes up a little of both with no strong preference is called neutrophilic — the basis of the “neutrophil” leukocyte's granule colour.
Pay attention to the wording trap that catches half the class: haematoxylin is the basic dye, but the structures it stains are themselves acidic. The convention names the structure after the dye it loves, not after its own chemistry. So “basophilic” describes a structure that loves the basic dye — which means the structure itself is acidic. Repeat it three times before you forget: basophilic = acidic structure = stains blue with haematoxylin.
- Haematoxylin — a basic (cationic) dye. It binds acidic (anionic, negatively-charged) tissue components and colours them blue–purple. Such components are called basophilic (“base-loving” for the dye).
- Eosin — an acidic (anionic) dye. It binds basic (cationic, positively-charged) components and colours them pink–red. Such components are acidophilic (= eosinophilic).
- Neutrophilic — affinity for both / neutral dyes (the basis of the “neutrophil” granule, which stains faintly with both).
| Affinity | Dye / colour | What stains this way | Why (chemistry) |
|---|---|---|---|
| Basophilic | Haematoxylin / blue–purple | Nucleus / chromatin (DNA), nucleolus, RER & free ribosomes (RNA), cartilage matrix, basophil/mast-cell granules | Rich in nucleic acids (phosphate groups) & acidic glycosaminoglycans → net negative charge attracts the cationic dye. |
| Acidophilic / eosinophilic | Eosin / pink–red | Most cytoplasm, collagen fibres, mitochondria, RBCs, keratin, eosinophil granules, secretory (zymogen) granules of many cells | Rich in basic proteins (many –NH₃⁺ / cationic amino-acid groups) → net positive charge attracts the anionic dye. |
| Neutrophilic | Both / lilac | Neutrophil specific granules | Affinity for neither extreme. |
A practical corollary you will use over and over: when you see a cell with strongly basophilic cytoplasm — the pancreatic acinar cell, the plasma cell, the Nissl bodies of a neuron — the blue colour is telling you the cytoplasm is full of ribosomal RNA on rough endoplasmic reticulum. In plain terms, that cell is busy making protein for export. The colour itself is a clue to function. This is why histology rewards thinking, not memorisation.
Stains are magnets. Haematoxylin is a + magnet, so it sticks to − things (DNA, RNA — full of phosphates). Eosin is a − magnet, so it sticks to + things (most cytoplasmic proteins — full of amino groups). Blue follows the nucleic acids; pink follows the proteins.
Nucleus = Blue = Basophilic. Haematoxylin is the basic dye but it stains acidic stuff (DNA/RNA). Think: “Baseophilic structures love the blue; they are themselves acidic.” Conversely cytoplasm = pink = acidophilic/eosinophilic. A cell with strongly basophilic cytoplasm (e.g. plasma cell, pancreatic acinar cell, neuron Nissl bodies) is telling you it is packed with RER/ribosomes → active protein synthesis.
A pathologist reads nuclear features (haematoxylin) to grade cancer: enlarged, irregular, hyperchromatic (intensely basophilic) nuclei with a high nucleus-to-cytoplasm ratio signal malignancy. The same baso/acidophilia logic identifies the strongly basophilic cytoplasm of antibody-secreting plasma cells in chronic inflammation.
• Are basophilic structures themselves acidic or basic? → Acidic (they bind the basic dye).
• Three classically basophilic structures? → Nucleus (DNA), nucleolus, RER/ribosomes (rRNA).
• Three classically acidophilic structures? → Most cytoplasm, collagen, RBCs (also mitochondria, keratin).
• A cell with strongly blue cytoplasm tells you what about its function? → Packed with RER/ribosomes → active protein synthesis (e.g. plasma cell, pancreatic acinar cell).
H&E shows nuclei and cytoplasm beautifully but it is almost blind to a long list of important structures: reticular fibres are nearly invisible, basement membranes blend into surrounding tissue, glycogen washes out, elastic fibres look like nothing, amyloid is silent. For each of these gaps, histologists have a special stain — a chemistry tuned to bind one particular target and shout it in colour. You will meet the same handful of special stains again and again across the whole course, so learn the four-column table once now and the rest of the year becomes shorter.
| Stain | Result | Demonstrates | Where it appears later |
|---|---|---|---|
| PAS (Periodic acid–Schiff) | Magenta / magenta-red | Carbohydrate-rich structures: glycogen, basement membrane, mucin (goblet cells), brush border / glycocalyx, reticular fibres, fungal cell walls | Kidney BM, GI brush border, glomerulus, liver glycogen |
| Silver impregnation (argyrophilia) | Black | Reticular fibres (type III collagen), basement membranes, nerve fibres & neurofibrils | Liver, lymph node, spleen stroma; bile canaliculi; neurons |
| Masson trichrome | Collagen blue/green, muscle & cytoplasm red, nuclei dark | Distinguishes collagen from muscle; quantifies fibrosis | Fibrosis, cirrhosis, cardiac scar |
| Elastic stains (orcein, resorcin-fuchsin, Verhoeff) | Elastic fibres brown / black / purple | Elastic fibres & laminae (poorly seen on H&E) | Elastic arteries (aorta), elastic cartilage, lung |
| Wright / Giemsa (Romanowsky) | Differential pink–blue | Blood & bone-marrow smears — identifies leukocyte types | Unit 4 Blood (drawing/labelling question) |
| Congo red | Salmon-pink; apple-green birefringence under polarised light | Amyloid | Pathology cross-link |
Two of these deserve special attention because they recur constantly. PAS turns any sugar-rich structure bright magenta — that is how basement membranes are made visible at the kidney glomerulus, how glycogen is shown in hepatocytes, how the brush border of the intestine is highlighted, and how goblet-cell mucin is identified. Silver impregnation is the only good way to see reticular fibres (type III collagen) — they are argyrophilic, meaning silver salts deposited onto them are reduced to black metal, outlining the fibre network that scaffolds the liver, lymph node and spleen.
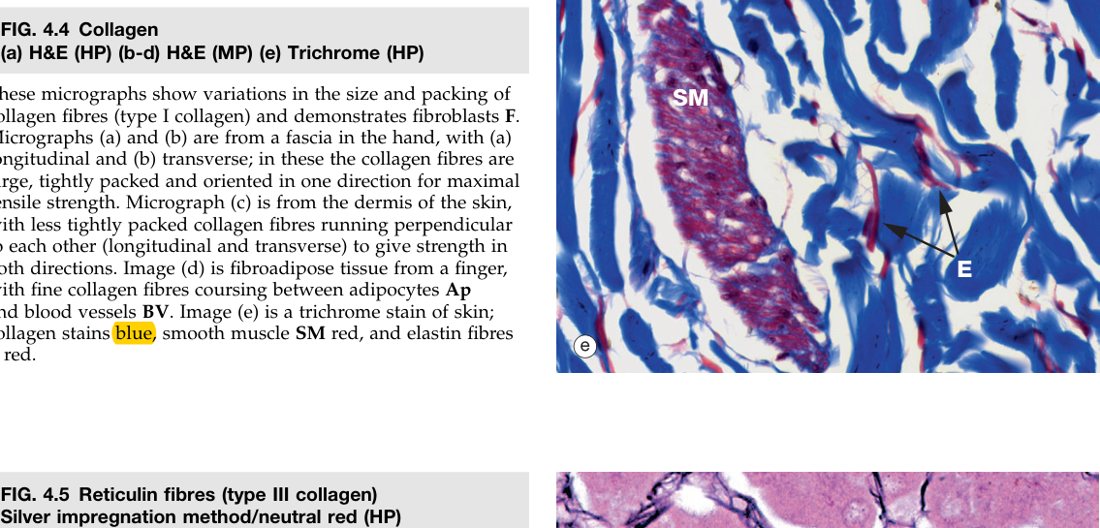
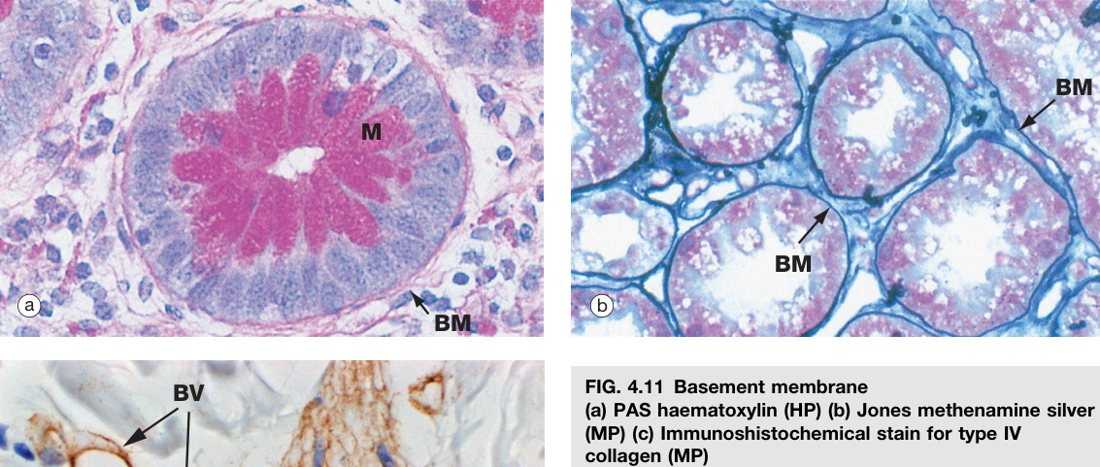
Argyrophilic structures are those that bind and reduce silver salts to appear black (classically reticular fibres). The PAS reaction oxidises tissue carbohydrates with periodic acid, then Schiff reagent binds the products to give a magenta colour — the standard way to show glycogen and basement membranes.
• Stain for reticular fibres? → Silver impregnation (black) — they are argyrophilic.
• Stain that separates collagen from muscle? → Masson trichrome (collagen blue/green, muscle red).
• Stain for elastic fibres? → Orcein, resorcin-fuchsin, or Verhoeff.
• Stain for blood films? → Wright / Giemsa (Romanowsky).
• Stain that shows apple-green birefringence under polarised light? → Congo red on amyloid.
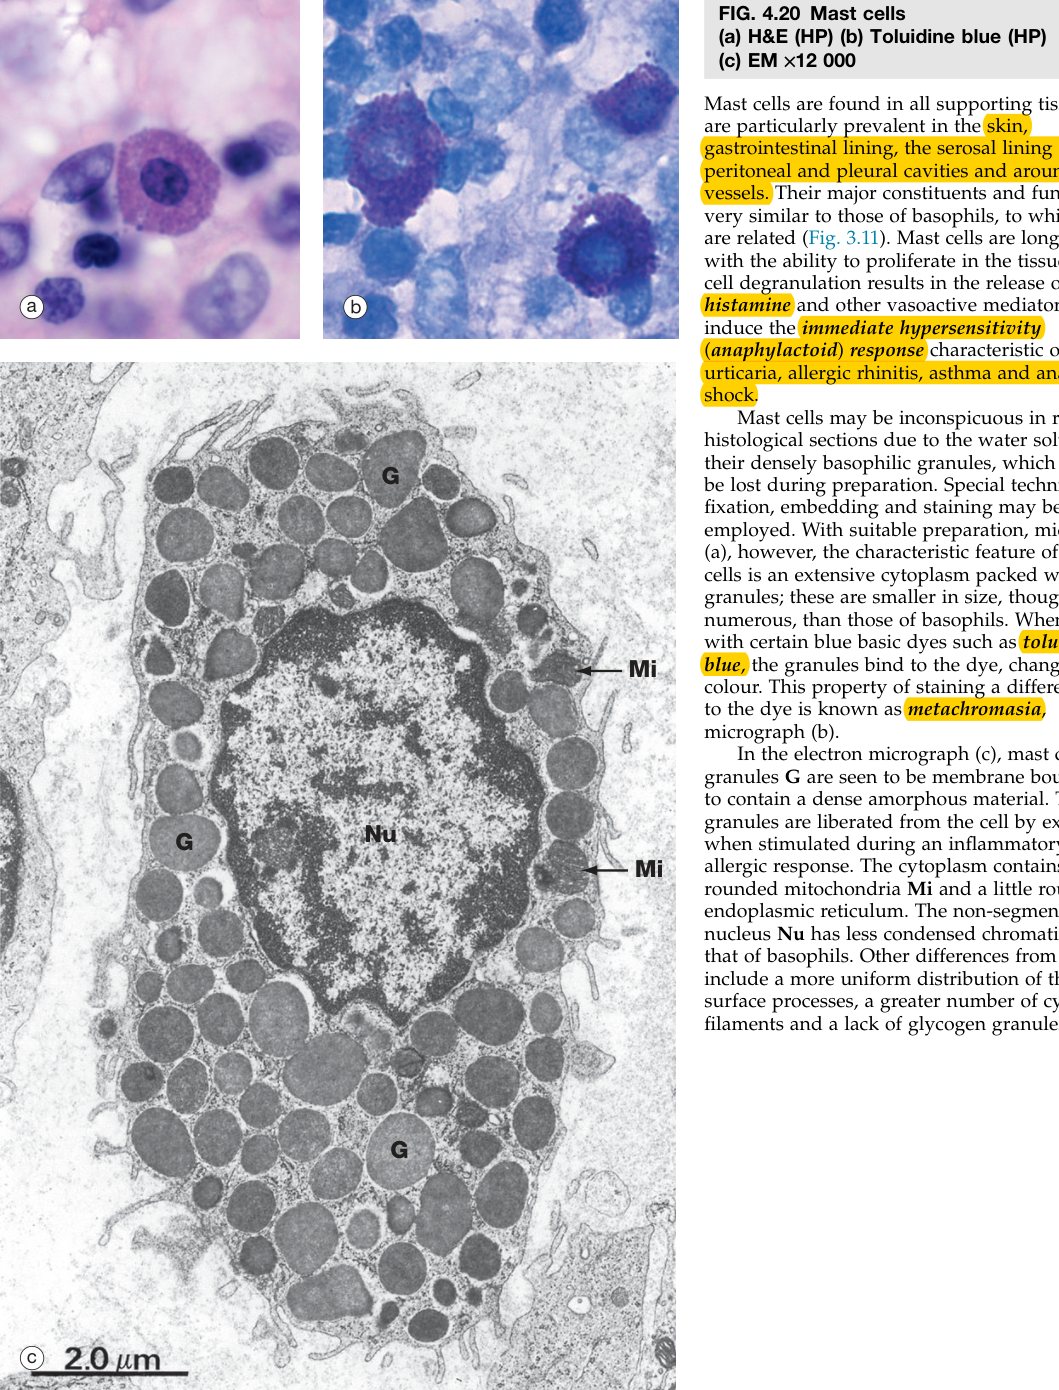
Occasionally a dye does something unexpected: instead of staining a structure its own colour, it stains it a different colour. Toluidine blue is, by name and by bottle, blue — yet when you drop it on mast-cell granules they turn purple-red. That shift is called metachromasia, and it happens when the target structure is packed with closely-spaced negative charges (densely sulphated glycosaminoglycans). The dye molecules stack on each other so tightly that their absorption spectrum shifts, and a blue dye reads out as red. It is a chemistry trick, but it is a diagnostic gift: anything that metachromatically stains red with toluidine blue is, almost by definition, rich in sulphated GAGs.
Metachromasia is the property by which certain tissue components stain a colour different from the dye itself. With the blue dye toluidine blue, highly anionic, densely-packed polyanions (sulphated glycosaminoglycans) stain purple/red instead of blue.
The classic metachromatic structures are mast-cell granules (full of heparin, a sulphated GAG), cartilage matrix (chondroitin sulphate), and some mucins. When you see them red against a blue background, you have just visualised the sulphate.
• Chemistry behind it? → Densely-packed sulphated GAGs (polyanions) shift the dye's absorption.
• Classic dye used to demonstrate it? → Toluidine blue.
• Two classic metachromatic targets? → Mast-cell granules (heparin); cartilage matrix (chondroitin sulphate).
Electron Microscopy
The light microscope hits a wall at about 0.2 µm. Below that, two points blur into one no matter how good your lens — a limit set by the wavelength of visible light itself. Organelles are smaller than that limit. You can see a mitochondrion as a faint pink speck on H&E, but you cannot resolve its inner membrane folds, and a ribosome is hopeless. To see ultrastructure you need a probe with a much shorter wavelength: an electron beam.
The electron microscope replaces light with a focused beam of electrons and glass lenses with electromagnets. Because electrons have wavelengths a thousand times shorter than visible light, the EM resolves down to about 0.1–0.2 nm — roughly a thousandfold finer than the LM. This is what made the modern cell biology of the 1950s possible: when the EM came online, the rough endoplasmic reticulum, ribosomes, lysosomes and Golgi cisternae stopped being theoretical and became visible.
Two flavours exist. Transmission EM (TEM) passes the electron beam through an ultrathin slice (50–100 nm cut with a diamond knife on an ultramicrotome) and shows internal organelles — the standard EM image of cell interior. Scanning EM (SEM) sweeps the beam across the surface of a gold-coated specimen and renders a three-dimensional surface relief — the picture you see of microvilli on an intestinal cell, or of pollen grains, or of the surface of red blood cells.
| Feature | Light microscope (LM) | Transmission EM (TEM) | Scanning EM (SEM) |
|---|---|---|---|
| Beam | Visible light | Electron beam (through specimen) | Electron beam (over surface) |
| Resolution | ~0.2 µm (200 nm) | 0.1–0.2 nm | ~3–10 nm |
| Shows | Tissue/cell architecture, colour (dyes) | Internal ultrastructure (organelles, membranes, junctions) | 3-D surface topography |
| Section | 5–10 µm (microtome) | Ultrathin 50–100 nm (ultramicrotome, diamond/glass knife) | Whole surface, no section |
| “Stain” | H&E etc. (colour) | Heavy metals: osmium tetroxide, uranyl acetate, lead citrate | Gold / palladium coat |
| Image | Coloured | Greyscale: electron-dense (dark) vs electron-lucent (light) | Greyscale 3-D relief |
EM has no colour at all — only shades of grey. The contrast comes from how many electrons are scattered or absorbed at each point. Areas loaded with heavy-metal stains (osmium-bound membranes, uranyl-bound chromatin) scatter many electrons and appear electron-dense (dark). Areas the beam passes through easily appear electron-lucent (light). When you describe a TEM image, you use those two terms, never “blue” or “pink.”
Electron-dense = darker areas that scatter/absorb more electrons (heavy-metal-bound, e.g. chromatin, membranes). Electron-lucent = pale areas that electrons pass through. In TEM there is no colour — only shades of grey.
TEM is the chest X-ray of the cell — a beam shot through the specimen, dense parts dark, lucent parts pale. SEM is the satellite photograph — a beam swept across the surface, returning a 3-D relief of the landscape. TEM shows you the inside; SEM shows you the outside.
• TEM resolution? → ~0.1–0.2 nm (about 1000× better than LM).
• TEM section thickness and knife? → 50–100 nm, cut on an ultramicrotome with a diamond (or glass) knife.
• EM fixatives? → Glutaraldehyde then osmium tetroxide; contrast with uranyl acetate and lead citrate.
• TEM vs SEM in one line? → TEM = internal ultrastructure (beam through); SEM = 3-D surface (beam over).
• Why no colour on EM? → The image is built from electron scattering, not absorption of visible light — only greyscale (electron-dense vs electron-lucent).
Advanced Techniques
Routine H&E and EM tell you what structure is there. Modern histology asks a sharper question: which specific molecule is there, and where? The answer is a family of techniques that use molecular recognition — an antibody for a protein, a complementary nucleic-acid probe for a sequence, an in-situ chemical reaction for an enzyme — to put a visible label exactly where the target molecule sits in the tissue.
The single most clinically important of these is immunohistochemistry (IHC). The principle is simple: an antibody binds its antigen with exquisite specificity, and if you attach a coloured tag to the antibody (an enzyme that develops a brown product, or a fluorochrome that glows under UV), the antigen lights up exactly where it is. IHC is how a pathologist proves that a poorly differentiated tumour is of epithelial origin (cytokeratin-positive), that a lymphoma is B-cell (CD20-positive) rather than T-cell (CD3-positive), and that a breast cancer is hormone-receptor positive — the staining result directly drives treatment.
| Technique | Principle | What it localises |
|---|---|---|
| Histochemistry / cytochemistry | A chemical reaction in situ yields a coloured/insoluble product | Specific chemicals or enzyme activity (e.g. phosphatases, glycogen) |
| Immunohistochemistry (IHC) / ICC | Labelled antibodies bind a target antigen; label = fluorescent dye or enzyme (peroxidase → brown) | A specific protein/antigen — basis of tumour typing (cytokeratin, CD markers, ER/PR) |
| In situ hybridization (ISH) | Labelled complementary nucleic-acid probe binds target sequence | A specific mRNA or DNA sequence within the cell |
| Cell & tissue culture | Cells grown/maintained in vitro in defined media | Living-cell behaviour, proliferation, drug response |
| Autoradiography | Radiolabelled precursor incorporated, detected by photographic emulsion | Sites/timing of synthesis (e.g. DNA, secretory protein) |
IHC is the workhorse of diagnostic pathology: cytokeratin marks epithelial (carcinoma) cells, CD markers classify lymphomas/leukaemias, and oestrogen/progesterone receptor and HER2 staining on breast cancer directly determines hormonal and targeted therapy. ISH (e.g. HER2 FISH) detects gene amplification.
• Method to localise a specific mRNA or DNA sequence? → In-situ hybridization (labelled nucleic-acid probe).
• Method to localise enzyme activity? → Histochemistry / cytochemistry (in-situ reaction producing coloured product).
• Method to detect newly-synthesised DNA? → Autoradiography with ³H-thymidine.
• Two clinical uses of IHC? → Tumour typing (cytokeratin, CD markers); receptor status of breast cancer (ER/PR/HER2).
How to Read a Histological Section
An exam slide is a 2-D slice through a 3-D structure, and the single most common student error is to forget that. A tubule cut transversely looks like a ring; the same tubule cut longitudinally looks like two parallel lines; cut obliquely it looks like an ellipse. None of those appearances mean “different structures.” They mean the knife went through the same tubule at different angles. Trained eyes constantly ask: what 3-D shape would give me this 2-D profile?
A second common trap is the missing nucleus. A 5 µm section may pass through a cell without ever crossing its nucleus, so the cell looks anucleate on this slide even though it has a perfectly good nucleus a few micrometres up or down. Genuine anucleate cells exist (mature RBCs, platelets, superficial keratinised squames) — but most apparent “missing nuclei” are just plane-of-section effects.
The professional routine for reading any slide is organ → tissue → cell. Start at the lowest objective: which organ am I looking at? Where is the capsule, the cortex, the medulla? Then bump the magnification up: which of the four basic tissues is this region? Only at the highest power do you start identifying individual cells. Combine that with the two-colour stain logic — blue points to nuclei and protein-synthesising cytoplasm, pink points to most cytoplasm, collagen, muscle and red cells — and slides that looked like pink-and-blue chaos start to read like words on a page.
- Section plane changes appearance. A single tubule cut transversely looks like a ring; cut longitudinally it looks like two parallel lines; cut obliquely it looks like an ellipse. Always reason “what 3-D shape would give this 2-D profile?”
- Not every cell shows its nucleus. A section may miss the nucleus of a cell, so “absent nucleus” on one cell is usually a plane-of-section effect — not a true anucleate cell (except genuinely anucleate cells: mature RBC, platelets, superficial keratinised squames).
- Work low power → high power. First orient (which organ? capsule? cortex/medulla?), then identify the tissue, then the cells.
- Use the two-colour logic. Blue (basophilic) points to nuclei and protein-synthesising cells; pink (acidophilic) points to cytoplasm, collagen, muscle and RBCs.
- Empty round spaces are usually lumina (vessels, ducts, glands) or dissolved-fat vacuoles (adipocytes) — not holes in the tissue.
“Organ → Tissue → Cell” at increasing magnification, then confirm with stain logic. This is exactly how the lab/practical slide-identification questions are marked.
• A cell on the slide has no nucleus — is it always anucleate? → No — usually a plane-of-section effect; truly anucleate cells = mature RBC, platelets, keratinised squames.
• The order of magnification used to read a slide? → Organ → tissue → cell (low power first, then up).
• An empty round space on H&E is most likely? → A lumen or a dissolved-fat vacuole — not a hole in the tissue.
TMU Exam Drill
📝 Open the full TMU Question Bank — 20 MCQ + 6 terms + 5 essays →
Authentic Tianjin Medical University past-paper questions (2021 Final & the multi-section Final with answer key) mapped to this unit, in the real exam format. Click Show answer to self-test. Note: the Introduction unit is not directly examined; these are TMU-format practice items on technique.
□ Explain the following terms
Foundation locked in
You now own the staining & microscopy vocabulary used in Units 2–18. Next: Epithelial Tissue.